
Renovating dozens of apartments at once multiplies risk: one SKU swap here, a verbal instruction there, and suddenly Unit 3B looks nothing like 3C.
If you’re the GC or renovation PM, you don’t need design theory—you need a repeatable, enforceable system.
This step-by-step SOP centers on documentation and workflow controls that lock standards early, prevent unauthorized changes, and keep installation consistent across every unit.

Step 0 — Build the Spec Baseline (CSI-aligned Spec Book)
Start by establishing a single source of truth.
Build a Spec Book aligned to CSI conventions and Division 01 submittal procedures.
Organize by MasterFormat sections and follow a simple three-part structure (administrative requirements, products, execution).
Include submittal requirements, samples/mock-ups, shop drawings, warranties, and closeout.
Create a controlled project folder—your common data environment (CDE)—with distinct “Current” and “Superseded” areas, add a revision history table to the Spec Book, and assign clear ownership (PM maintains, superintendent enforces).
According to Division 01 practices, action submittals must be reviewed and approved before related work proceeds; don’t fabricate, ship, or install items awaiting approval.
For a clear overview of submittal procedures and roles, see the descriptive guides by Linarc on construction submittals and Fluix’s step-by-step submittal process.
Spec Book folder structure (example)
- 01 – Administrative (Submittals, QA/QC, Closeout)
- 02–14 – Technical Sections (finishes, plumbing, lighting, casework, flooring)
- Drawings + Finish Schedules (linked)
- Mock-up records
- Submittal Register
- Change Control & Variance Log
Step 1 — Finish Schedule Matrix for Apartment Spec Standardization
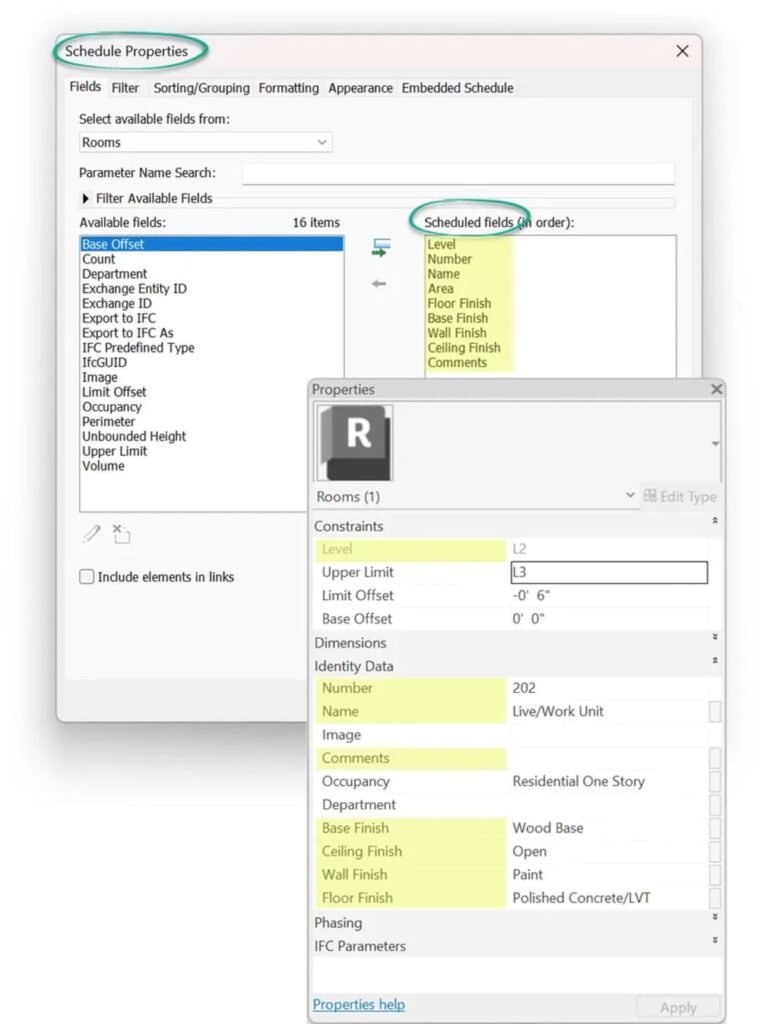
Standardization lives or dies in your finish schedules.
Define unit types (A1, B2, etc.) and room types (Kitchen, Bath 2, Bedroom, Corridor).
For each finish, capture manufacturer, line/model, SKU, color code, pattern, performance criteria, and installation pattern.
Maintain one master schedule and issue numbered revisions.
A clear schema keeps repetition tight.
Conceptual primers help frame the components you’ll capture; for a practical overview of spec-sheet fields, see this step-by-step guide to creating specification sheets
Compact finish schedule matrix (example)
| Unit Type | Room | Category | Finish Code | Manufacturer | Model/SKU | Color/Code | Pattern/Notes |
|---|---|---|---|---|---|---|---|
| A1 | Kitchen | Flooring | FLR-01 | Brand X | LVP-2478 | Oak 103 | Herringbone, 3 mm wear |
| A1 | Kitchen | Counter | CTR-02 | Brand Y | QZ-7712 | Cloud | 1.5″ eased edge |
| A1 | Bath | Wall Tile | TIL-05 | Brand Z | CT-330 | White 01 | 3″x6″ subway, 1/8″ grout |
Publish only from the master via the CDE—no side copies. Keep a visible revision log (Rev#, date, description, affected unit/room types), and make sure finish tags on drawings match schedule codes so field crews can cross-check.
Step 2 — Build the Submittal Register (CSI-mapped) and Schedule It
Extract submittals from each specification section’s SUBMITTALS article.
Map them to your schedule logic:
- long-lead items first
- GC preliminary review buffer
- design-team review durations
- “required-for” installation start
Use a firm “no work before approval” rule.
Action submittals (product data, shop drawings, samples/mock-ups) must come back “Approved” (or “Approved as Noted”) before procurement or installation.
For a how-to and register examples, reference the WBDG guidance on registers in SpecsIntact’s Submittal Register report and complementary explainers like RDash’s complete guide to submittals.
Compact submittal register (example)
| CSI Sec | Item | SD Type | Reviewer | Needed For | Due | Status |
|---|---|---|---|---|---|---|
| 09 65 13 | LVP product data | Action | A/E | A1 Kitchen flooring | 02/10 | In Review |
| 12 36 00 | Solid-surface shop dwgs | Action | A/E | A1 Kitchen counters | 02/15 | Approved |
| 09 30 13 | Wall tile samples | Action | A/E | A1 Bath tiling | 02/08 | Revise & Resubmit |
Stamp submittals after internal coordination, then enforce “no install without approval” in the field through your superintendent and foremen.
Step 3 — Mock-up Rooms and Formal Sign-off

Build one or more model units using actual specified materials and intended production methods.
Document and inspect with the owner, design lead, PM, superintendent, key subs, and maintenance.
Approval statuses include Approved, Approved as Noted, and Revise and Resubmit.
Only an approved mock-up authorizes purchasing and replication across units.
Practical process explainers include Fluix’s construction submittals guide and RDash’s step-by-step overview.
Mock-up sign-off essentials
- Unit ID, date, attendees
- Components reviewed (flooring, counters, tile, lighting, plumbing)
- Acceptance criteria (visual tolerances, model numbers, edge details, grout width)
- Photo log and notes
- Variance entries with reasons and approval authority
- Signatures (owner/design lead/GC)
Maintain a variance log capturing spec references, descriptions, root cause, cost/schedule impact, and final disposition with signatures.
Step 4 — Spec Freeze and Integrated Change Control
Define the spec-freeze milestone immediately after mock-up approval and critical submittals are approved. From this point, changes require formal requests, impact analysis, and re-approval; all documents must be revised and reissued.
PMI-aligned integrated change control keeps scope, schedule, and cost stable:
log the change request;
pre-screen;
analyze impacts across scope/schedule/cost/quality/risk/procurement;
recommend;
decide via the proper authority;
update baselines and documents;
communicate and implement;
then close.
Change request form (fields)
- Request ID, date, requester
- Description and spec references
- Reason (issue, substitution, supply risk)
- Impact analysis (scope, time, cost, quality, risk)
- Decision and authority
- Linked change order # (if applicable)
- Document updates and distribution
Step 5 — Bulk PO, Kitting, Labeling, Logistics

Once frozen, centralize purchasing and build unit-level kits. Batch by building stack and trade, label clearly, and deliver on a wave schedule aligned to installation sequences.
Kitting and packing list template (example)
| Property/Building/Floor/Unit | Room | Kit Type | SKU | Batch/Lot | PO# | Notes |
|---|---|---|---|---|---|---|
| Elm/1/3/3B | Kitchen | Flooring Kit | LVP-2478 | Lot A3 | PO-1024 | Drop zone: Kitchen |
| Elm/1/3/3B | Bath | Tile Kit | CT-330 | Lot B1 | PO-1027 | Include grout G-118 |
Disclosure: Yansourcing is our product.
For inbound sourcing and QC of bulk fixtures (e.g., ordering bathroom vanities from Asia), a neutral sourcing agent like Yansourcing can be used for supplier verification, consolidated bulk PO handling, and pre-shipment inspection.
Use such agents to support AVL compliance, not to bypass your approvals.
Step 6 — Incoming Quality Control (IQC)
Treat receiving as a formal inspection step.
Sample, verify, and quarantine nonconforming deliveries; record lot numbers and traceability.
Best-practice QA programs emphasize risk-based sampling, segregation of “hold” materials, and documented disposition.
For a public, detailed program, see Caltrans’ Construction Quality Assurance Program Manual (2023).
IQC receiving checklist (high level)
- Verify against AVL and Spec Book (model/SKU, finish code)
- Check CoCs/test reports/warranty terms
- Inspect samples per lot; note defects
- Label and log lot/batch numbers; record unit/room assignment
- Quarantine nonconforming material; issue NCR; decide disposition
Step 7 — Installation Consistency Checks (Lean PPC)
Even perfect specs fail without consistent installation.
Use layered QC (foreman, superintendent, occasional third-party spot checks) and track Percent Plan Complete (PPC) by trade and unit to surface variation early.
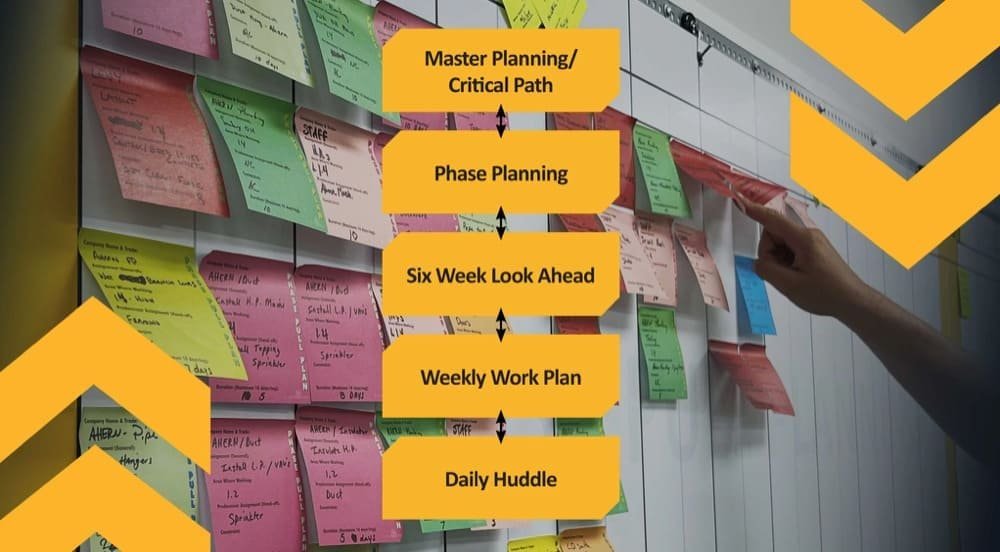
Lean practitioners outline a cadence of milestone planning, look-ahead, weekly work planning, and PPC plus variance analysis.
For a practical overview, see Last Planner System fundamentals.
Installation audit checklist (per room/type)
- Materials match approved mock-up and finish codes
- Orientation/pattern and edge/wrap details
- Tolerances (gaps, reveals, grout width) within acceptance ranges
- Fixtures and hardware installed per model numbers
- Photos and sign-off captured; variance logged if needed
Step 8 — Variance Management and Lessons Learned
Keep a living variance log that connects root cause to corrective actions and document updates. Link rework to responsible parties and cost/schedule impacts.
At phase close, issue as-builts and a final Spec Book revision capturing approved changes for the next phase.
In practice, apartment spec standardization pays off here, because lessons learned roll forward to future stacks and phases without reinventing standards.
Variance log (fields)
- Variance ID, date, unit/location
- Spec reference and description
- Root cause
- Corrective action and responsible party
- Cost/time impact
- Status and disposition
- Linked document updates
Appendix — Quick Templates & Document Control Rules
ProjectCode_Discipline_DocType_Zone-Unit_Status_Rev_YYYYMMDD is a practical naming convention.
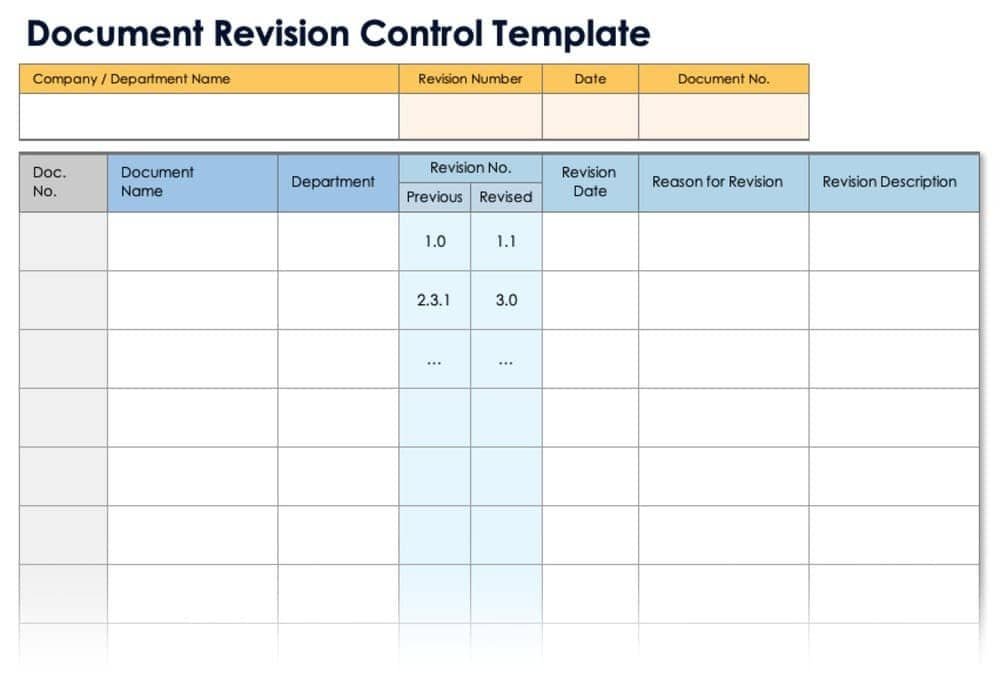
Maintain a revision table in each document (Rev, date, change description, author, approver) and publish only via the CDE with formal transmittals.
If your CDE doesn’t manage versions, keep “Current” and “Superseded” folders separate and audit access.
Troubleshooting-wise, mitigate version chaos with strict naming and controlled distribution; stop unauthorized field changes and route through change control; quarantine SKU mismatches at receiving and issue NCRs; and attack installation variation early with unit-level kits, room drop zones, and standard work instructions.
Bringing it together
Apartment spec standardization isn’t about picking the “perfect” tile—it’s about building a dependable machine: clear specs, formal approvals, a documented freeze, disciplined procurement, IQC, and layered QC in the field.
Put these gates and checklists in place, and every unit will look and perform like it was built by the same team—because it was.
